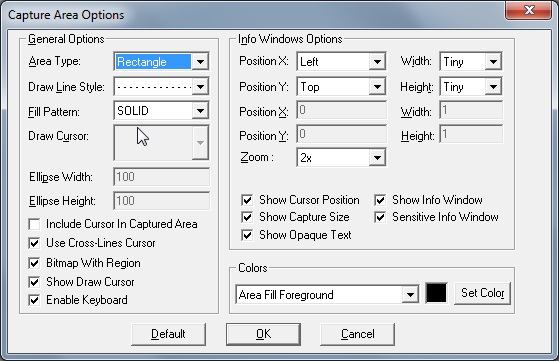
Capture Area Options Dialog
Use the Capture Area Options dialog to set capture area options.
To display the Capture Area Options dialog, from the main menu choose Options -> Capture Area Options.
The following fields are on the Capture Area Options dialog:
General Options Group
Area Type Drop-down list box
Use to set which shape to capture. Available shapes are rectangle, rounded rectangle, ellipse, triangle, polygon, and freehand.
Note: The Rounded Rectangle shape uses the values in the Ellipse Width and Ellipse Height text boxes to calculate its corners.
Draw Line Style Drop-down list box
Use to choose the line style for the border used during capture.
Fill Pattern Drop-down list box
Use to choose the fill pattern for the background of the capture.
Any non-rectangular capture will have some background area that will need to be filled, because the captured area will be placed onto the smallest rectangle that can fully contain it.
Draw Cursor Drop-down list box
Use to select which cursor to display during area selection. This is only enabled if the Cross-Lines Cursor check box is cleared.
Ellipse Width Text edit box
Use to set the size of the ellipse that will be used for the corners of a Rounded Rectangle shaped area capture.
Ellipse Height Text edit box
Use to set the size of the ellipse that will be used for the corners of a Rounded Rectangle shaped area capture.
Include Cursor In Captured Area Check box
Use to specify if the capture cursor (defined in the General Capture Options Dialog) will appear at the mouse-cursor location (if it inside the captured area) at the time of capture.
Cross-Lines Cursor Check box
Select this check box to use the default cross-lines cursor for area selection. The Cross Lines Cursor includes a yellow note box slightly below where the lines cross. It shows the exact location of where the lines cross.
Bitmap With Region Check box
Select this check box to create an image from the screen capture with the current selection set to the shape, which was captured.
Show Draw Cursor Check box
Select this check box to enable or disable the visibility of the area-selection cursor.
Enable Keyboard Check box
Select this check box to allow the <Ctrl>, <Shift>, <+>, < - > keys to affect the capture.
The <+> or < - > keys are used for zooming in or zooming out of the information window.
If an area is a rectangle, round rectangle, or ellipse, pressing <Ctrl> key will center the drawing.
If an area is a rectangle, round rectangle, or ellipse, pressing <Shift> key will draw regular shapes (that is, an ellipse becomes a circle, a rectangle becomes a square, etc.)
Info Window Options Group
The Info Window Options allows you to specify where the information window will appear and what size it will be. The information window provides information about the cursor being used to make the screen capture.
Position X Drop-down list box
Use to set the information-window position to left, right, or custom.
Position Y Drop-down list box
Use to set the information window position to top, bottom, or custom.
Width Drop-down list box
Use to set the width of the information window to Tiny, Small, Medium, Large, X-Large or custom.
Height Drop-down list box
Use to set the height of the information window to Tiny, Small, Medium, Large, X-Large or custom.
Custom Values
When the position or size is "custom", use these edit boxes to set the custom values.
Position X Text edit box
Use to set the information window x position value when the Position X drop-down box is set to custom.
Position Y Text edit box
Use to set the information window y position value when the Position Y drop-down box is set to custom.
Width Text edit box
Use to set the information window width value when the Width is set to custom.
Height Text edit box
Use to set the information window Height value when the Height is set to custom.
Zoom Drop-down list box
Use to set the amount of magnification applied to the pixels around the mouse cursor when viewed in the information window.
Show Cursor Position Check box
Select this check box to show the cursor position in the information window.
Show Info Window Check box
Select this check box to enable or disable visibility of the information window.
Show Capture Size Check box
Select this check box to show capture size information in the information window.
Sensitive Info Window Check box
Select this check box to enable/disable Sensitive detection for the information window position.
Show Opaque Text Check box
Select this check box to enable or disable text-background opacity in the information-box tool-tips showing position and size of captured area.
Colors Drop-down list
Selects what to color.
The following values are possible:
Area Fill Foreground: Sets the area fill foreground color.
Area Fill Background: Sets the fill color to be used for any portion of the resulting image that is not contained within the user-defined selection (used in non-rectangular captures).
Draw Polygon/Freehand Line: Sets the color of the line that marks the polygonal or freehand capture selection boundary while it is being drawn.
Cursor Position/Area Size Text: Sets the color of the text in the information-box tool-tip showing position and size of captured area while the selection is being drawn.
Cursor Position/Area Size Background: Sets the color of the background in the information-box tool-tip showing position and size of captured area while the selection is being drawn.
Set Color Button
Click this button to display a color palette. Select a color from the palette and close the dialog when finished. The selected color will be associated with the item in the drop-down list beside it.
Default Button
Click Default to restore default dialog options.
OK Command button
Click OK to close the dialog and save the changes.
Cancel Command button
Click Cancel to close the dialog and discard the changes.