Save to SharePoint As Dialog
Use the Save to SharePoint As dialog to upload a file to a SharePoint content management system.
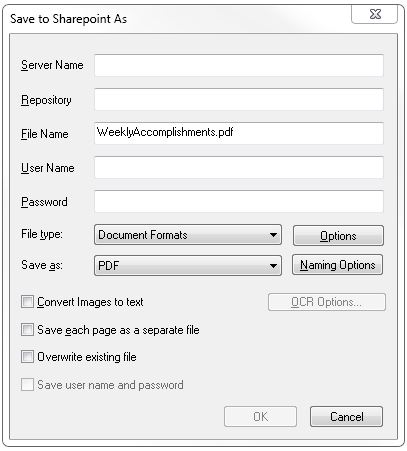
To display the Save to SharePoint As dialog, from the LEADTOOLS ePrint Workstation main menu, select File ➔ SharePoint Save As. The dialog appears in the following figure:
The following fields are on the Save to SharePoint As dialog:
Server Name Edit box:
Enter name of the server for the SharePoint site.
Repository Edit box:
Enter the name for the Repository of the SharePoint site. To create a new folder, add the folder name at the end.
File Name Edit box:
Enter the name of the file being saved.
User Name Edit box:
Enter the user name that has authentication to upload to the SharePoint site.
Password Edit box:
Enter the corresponding password for the user name.
File type Drop-down List box
Use the File type drop-down list box to select an output category (Document Formats, Image Formats, or Vector Formats). The formats listed in the Save As drop-down list box depend on which file type is selected.
(File Format) Options button
Click the Options button to open the properties dialog for the selected file format (if it has properties that can be set).
Save As Drop-down List box:
Use the Save As drop-down list box to select the file format for the file type selected in the File type Drop-down List box. If the desired format is unavailable, ensure that the appropriate file type has been selected from the File Type drop-down list box.
Naming options Button
Click the Naming Options button to open the Naming Options dialog, which specifies how to name files when saving multiple files.
This button is only available when saving a multiple page file and each page is being saved to a separate file.
Convert Images to Text Check box
Select this check box to perform optical character recognition on the file.
OCR options Button
Click this button to open the OCR Options dialog for the selected file format.
This button is only available for document or image file formats. The Convert Images to Text check box must be selected.
Save Each Page as a Separate File Check box
Select this check box to save each page of a multi-page file to a separate file. This option is only accessible when the selected document or image format supports multiple pages.
Overwrite existing file Check box
Select this check box to overwrite the file, if a file with the same name currently exists on the SharePoint site.
Save User Name and Password Check box
Select this check box to save the user name and password for the SharePoint site..
OK Button
Click OK to close the dialog, and save the configuration of the SharePoint setting.
Cancel Button
Click Cancel to close the dialog, and discard the configuration of the SharePoint setting.