Save As Dialog
Use the Save As dialog to save a raster image, vector image, or document file. For general descriptions of supported file formats in the Save As dialog, refer to Summary of All Supported File Formats.
The Save As dialog can be displayed by several methods.
-
From the main menu, choose File ➔ Save As.
-
From the workspace, press Ctrl+S.
-
From the Task Wizard ➔ Save Options page, select the I Want To Save To The Following Format(s) check box, and then click Add.
-
From the ePrint Task Printer Creation Wizard ➔ Save Options page, select the I Want To Save To The Following Format(s) check box, and then click Add.
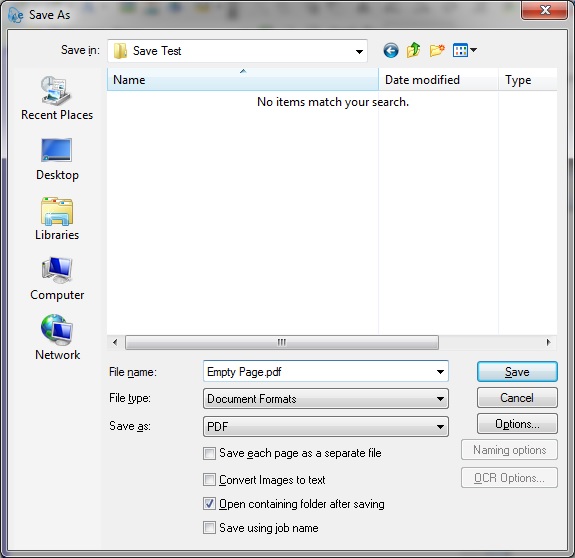
The following fields are on the Save As dialog:
Save in Drop-down List box:
Use the "Save in" drop-down list box to select the current drive or folder. The contents of this drive or folder will be listed in the space below. Saved files will also be stored in this location.
File Name Edit box:
Use the File Name edit box to enter the name of the file you wish to save.
File type Drop-down List box:
Use the File type drop-down list box to select an output category of Document Formats, Image Formats, or Vector Formats. Choosing a file type will affect the formats listed in the Save As Drop-down List box.
Save As Drop-down List box
Use the Save As drop-down list box to select the file format available for the chosen file type selected in the File type Drop-down List box. If a desired format is unavailable, ensure that the appropriate file type has been selected from the file type drop-down list box.
Save each page as a separate file Check box
Select this check box to save each page in a multi-page document as a separate file. This option is only accessible when the selected Document or Image Format supports multiple pages.
Open containing folder after saving Check box
Select this check box to open the folder containing the file after saving it.
Save using the job name Check box
Select this check box to automatically use the job name as the basis for the main part of the name for the saved file.
Save Button
Click the Save button to save the file and close the dialog box.
Cancel Button
Click the Cancel button to close the dialog box, without saving the file.
Options Button
Click the Options button to open the Save As Options dialog for the selected file format.
This button is only accessible for files of Document or Image Formats.
Naming options Button
Click the Naming Options button to display the Naming Options dialog, in order to specify the naming options to use when saving multiple files.
This button is accessible only when saving a multiple page file where each page is saved to a separate file.
OCR Options Button
Click this button to open the OCR Options dialog.
This button is only accessible for document files.
See Also
ePrint Task Printer Creation Wizard